
ROY_TRADER_007
@t_ROY_TRADER_007

What symbols does the trader recommend buying?
Purchase History
Trader Messages
Filter
Message Type
ROY_TRADER_007
XAUUSD TRADE SATUP READ CAPTION
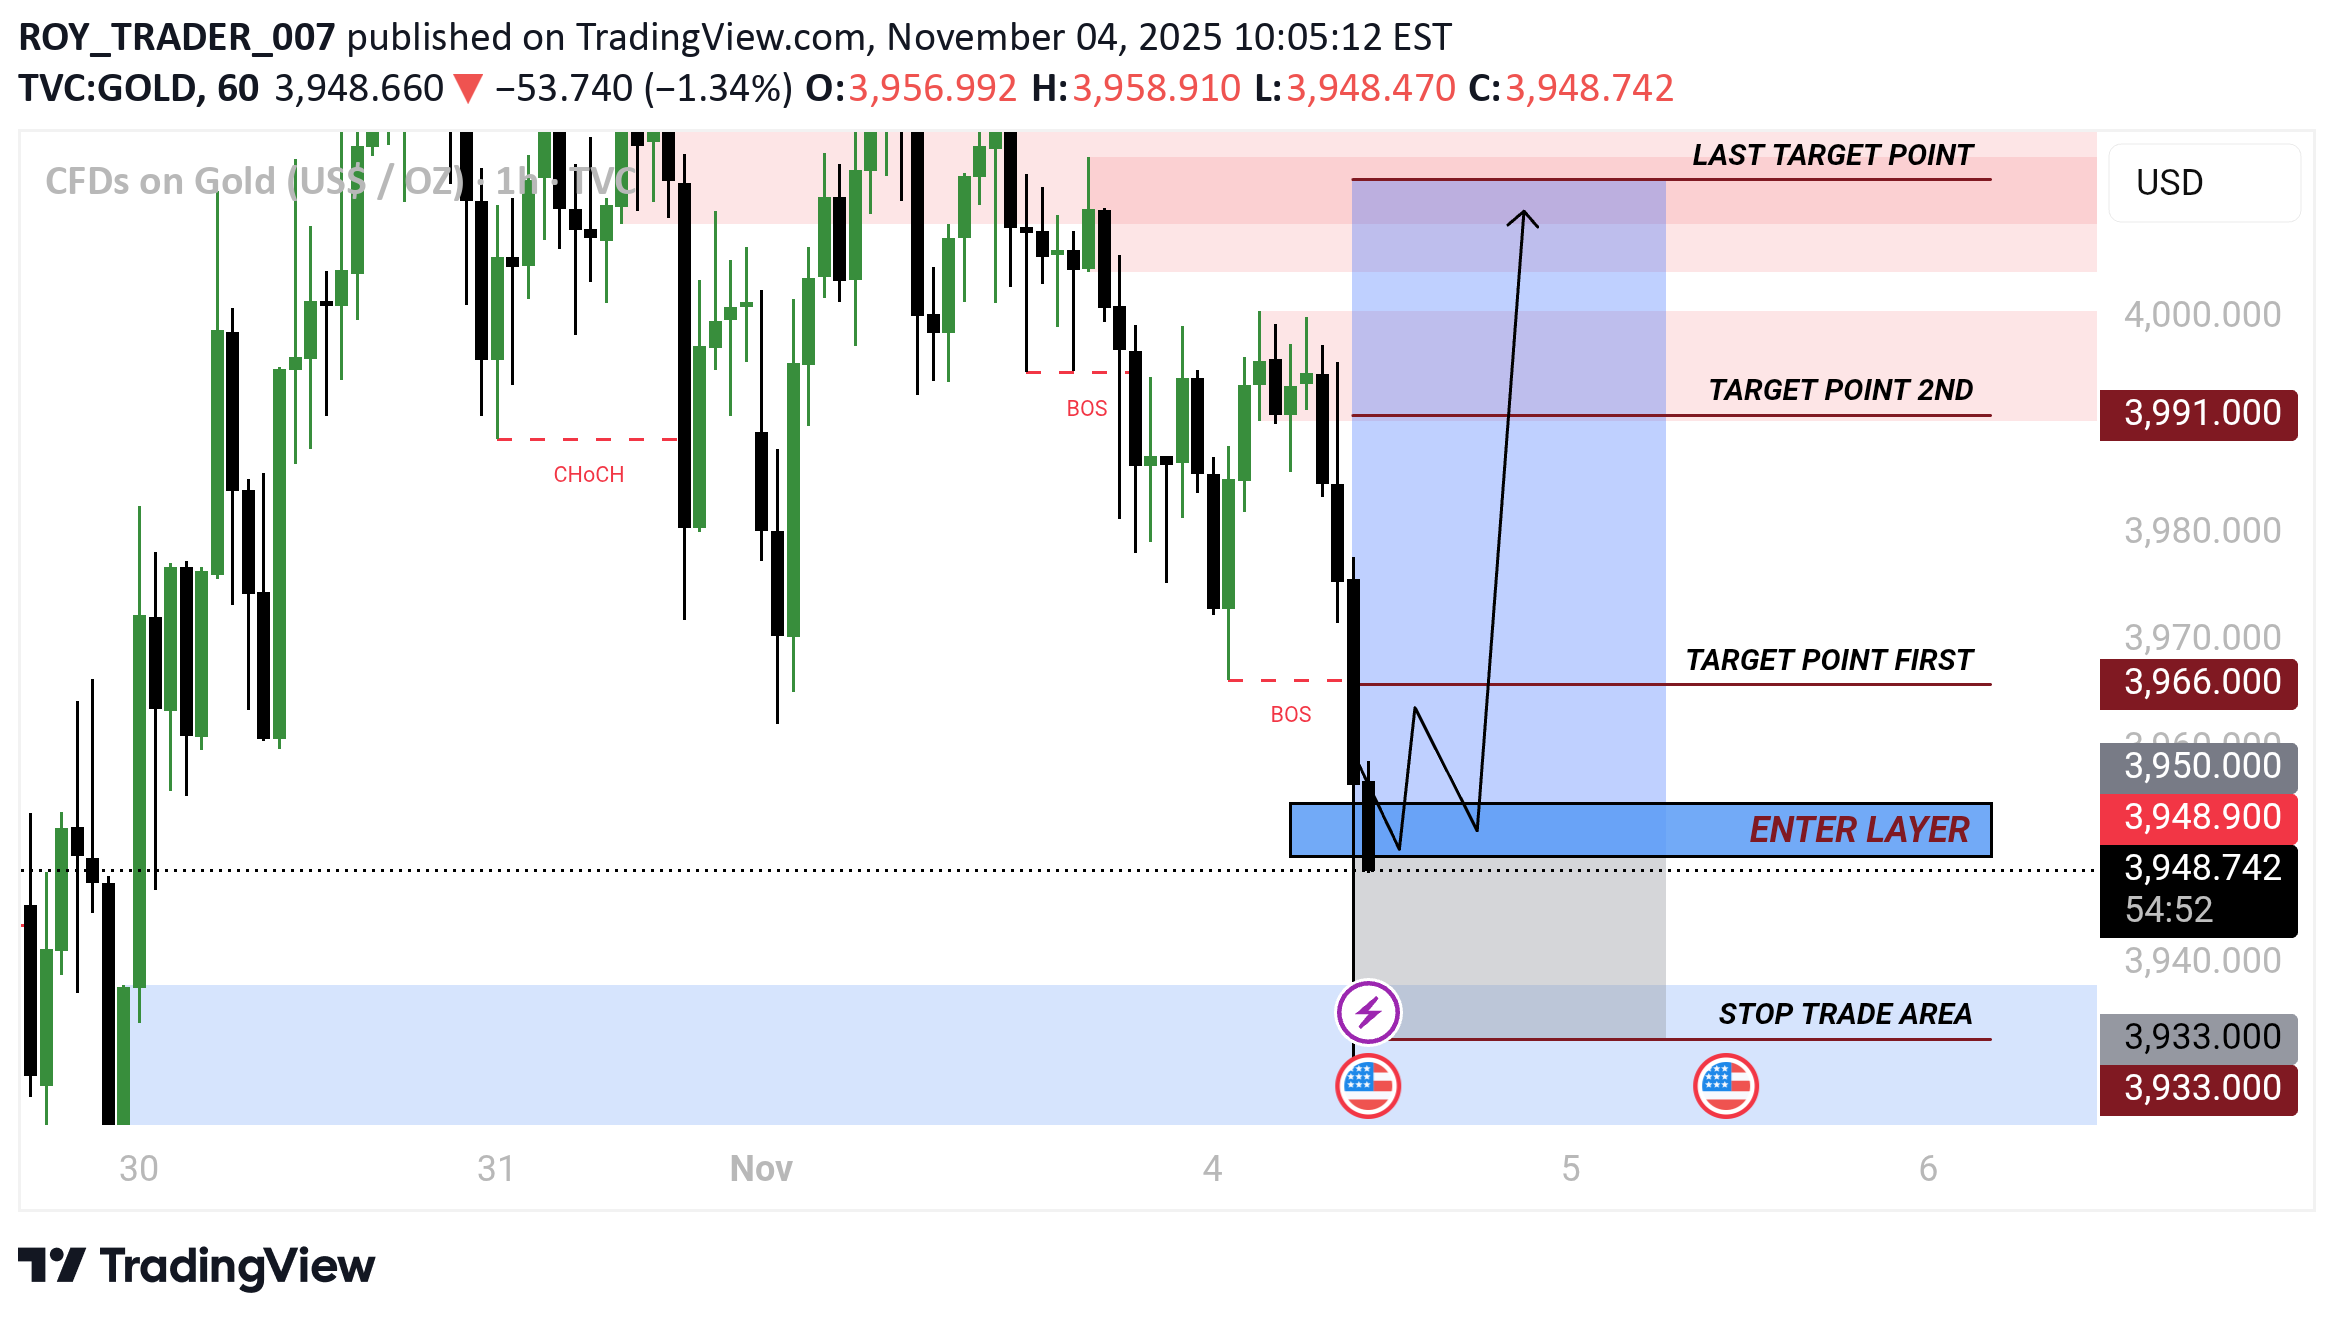
Enter Layer (≈ 3,950 – 3,956) This is the buy entry zone where you can look for bullish confirmation. It lies within a demand area after a drop, where institutions may start buying. Stop Trade Area (≈ 3,933) This is your stop-loss zone. If price breaks below this area, the setup is invalid (bullish idea fails Target Levels: Target Point 1: around 3,966 First take-profit zone — safe exit for partial profits. Target Point 2: around 3,991 Second take-profit — higher resistance or supply zone. Last Target Point: around 4,000 Final target — the top of the previous supply area.
ROY_TRADER_007
XAUUSD TRADE SATUP READ CAPTION
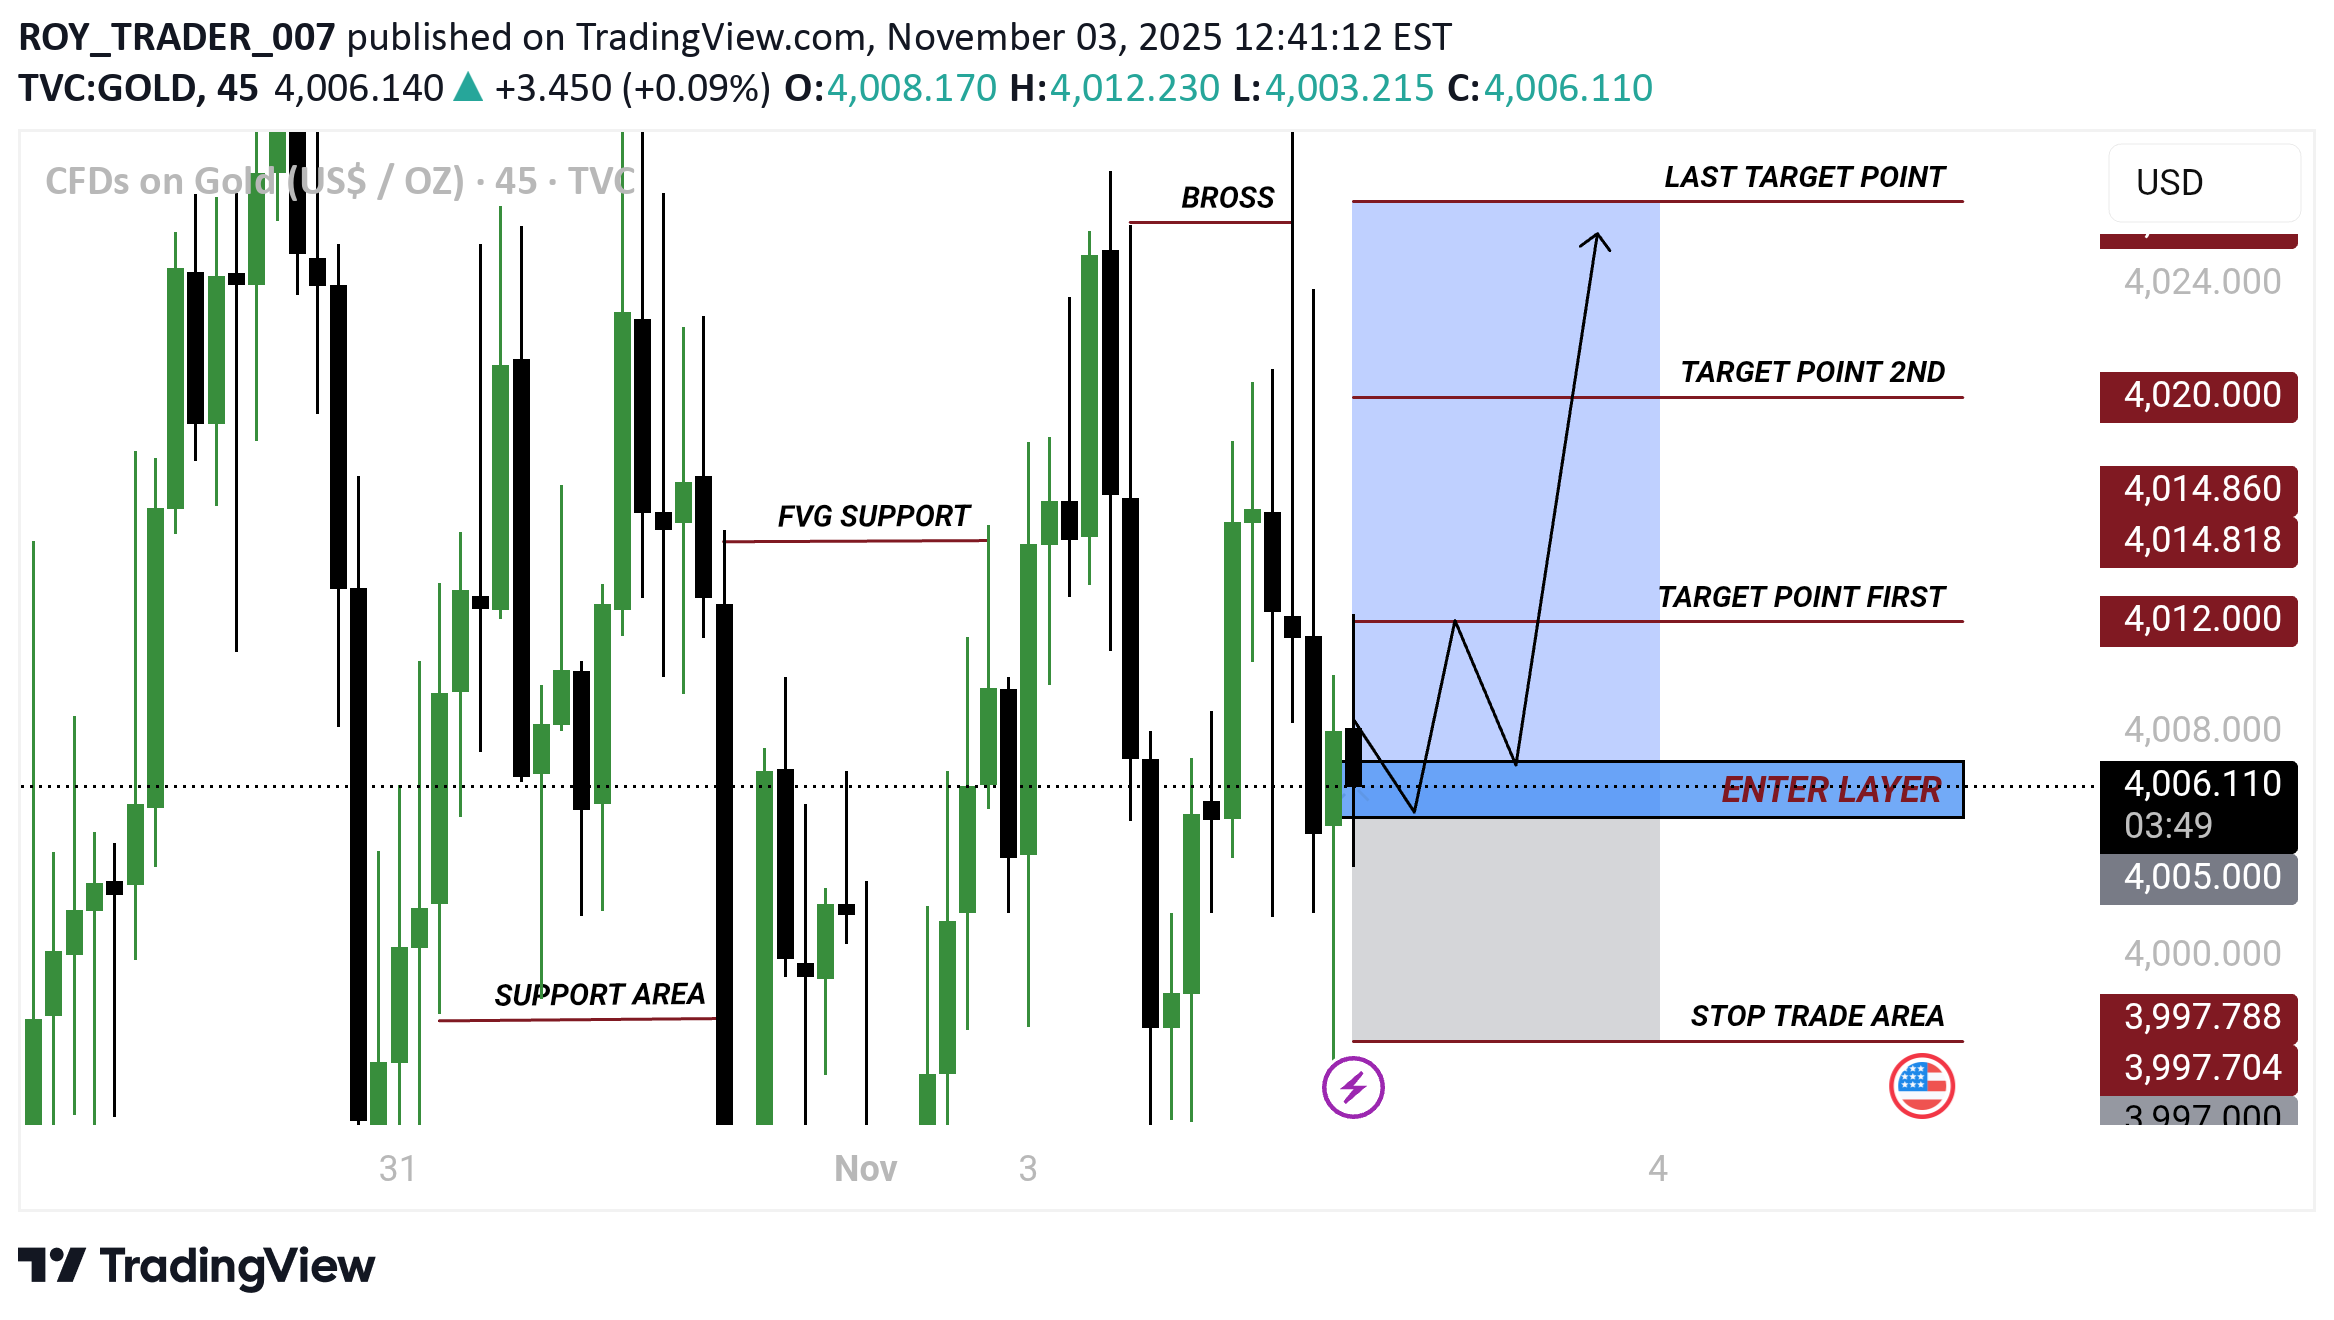
ENTER LAYER (Blue Zone) This blue box marks the entry zone for the trade — where the trader plans to buy. It’s likely based on a support area or fair value gap (FVG) support that could trigger a reversal. SUPPORT AREA (Bottom line) This red horizontal line marks a key historical support, where the price has previously bounced upward. It adds confidence that the entry near this level could be a good long opportunity. STOP TRADE AREA (Gray Zone below) This is the stop-loss zone, where the trade will be closed if price drops below this level (around $3,997–$3,998). It protects against further losses if the market moves against the trade. TARGET POINTS These are take-profit levels, where the trader may partially or fully exit the trade: Target Point First: $4,012 — first small profit zone. Target Point 2nd: $4,020 — larger profit. Last Target Point: (uppermost line, not labeled with number but likely around $4,024) — finaltake-profit target.
ROY_TRADER_007
BTCUSD TRADE SATUP READ CAPTION
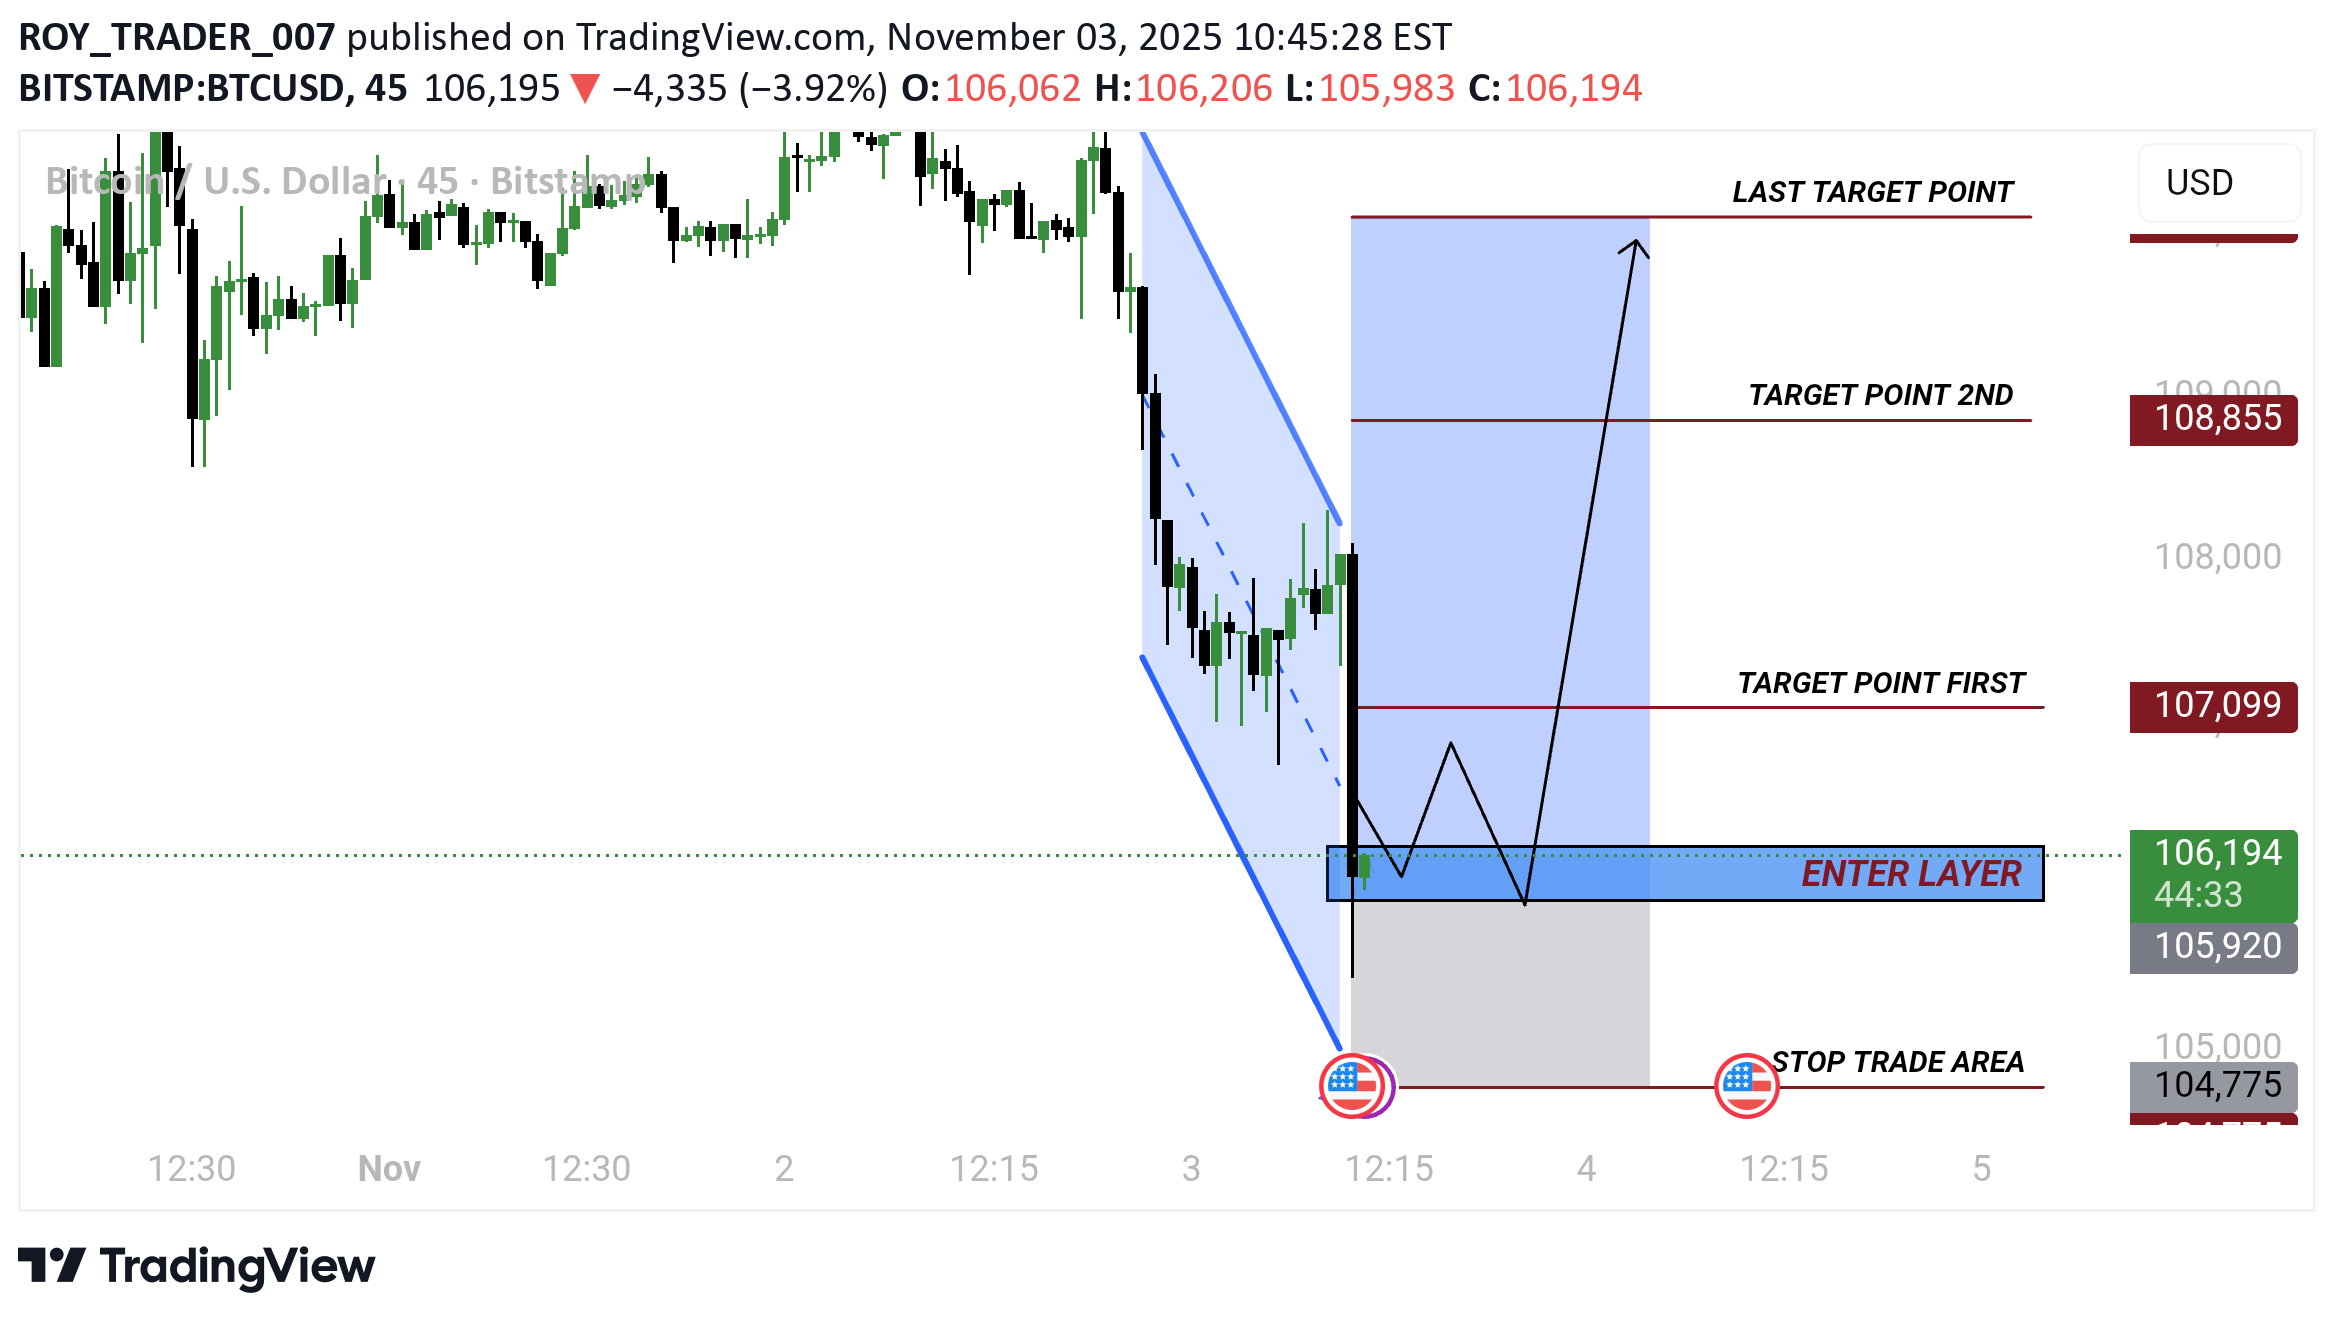
Enter Layer (Blue Box) This is the buy (entry) zone — around $105,920 to $106,323. Traders look for bullish signals (like reversals or confirmations) in this area before buying. It’s a support area, where the trader expects the price to stop falling and reverse. Stop Trade Area (Gray Box) Located below the entry zone, ending around $104,775. This is the stop-loss area — if the price falls below this level, the trader exits the trade to prevent further losses. It defines risk management. Target Points There are three profit targets marked in red: Target Point First: around $107,099 Target Point 2nd: around $108,855 Last Target Point: slightly above the 2nd, representing the final take-profit level These are progressive exit points — traders may close part of their position at each target.
ROY_TRADER_007
XAUUSD TRADE SATUP READ CAPTION
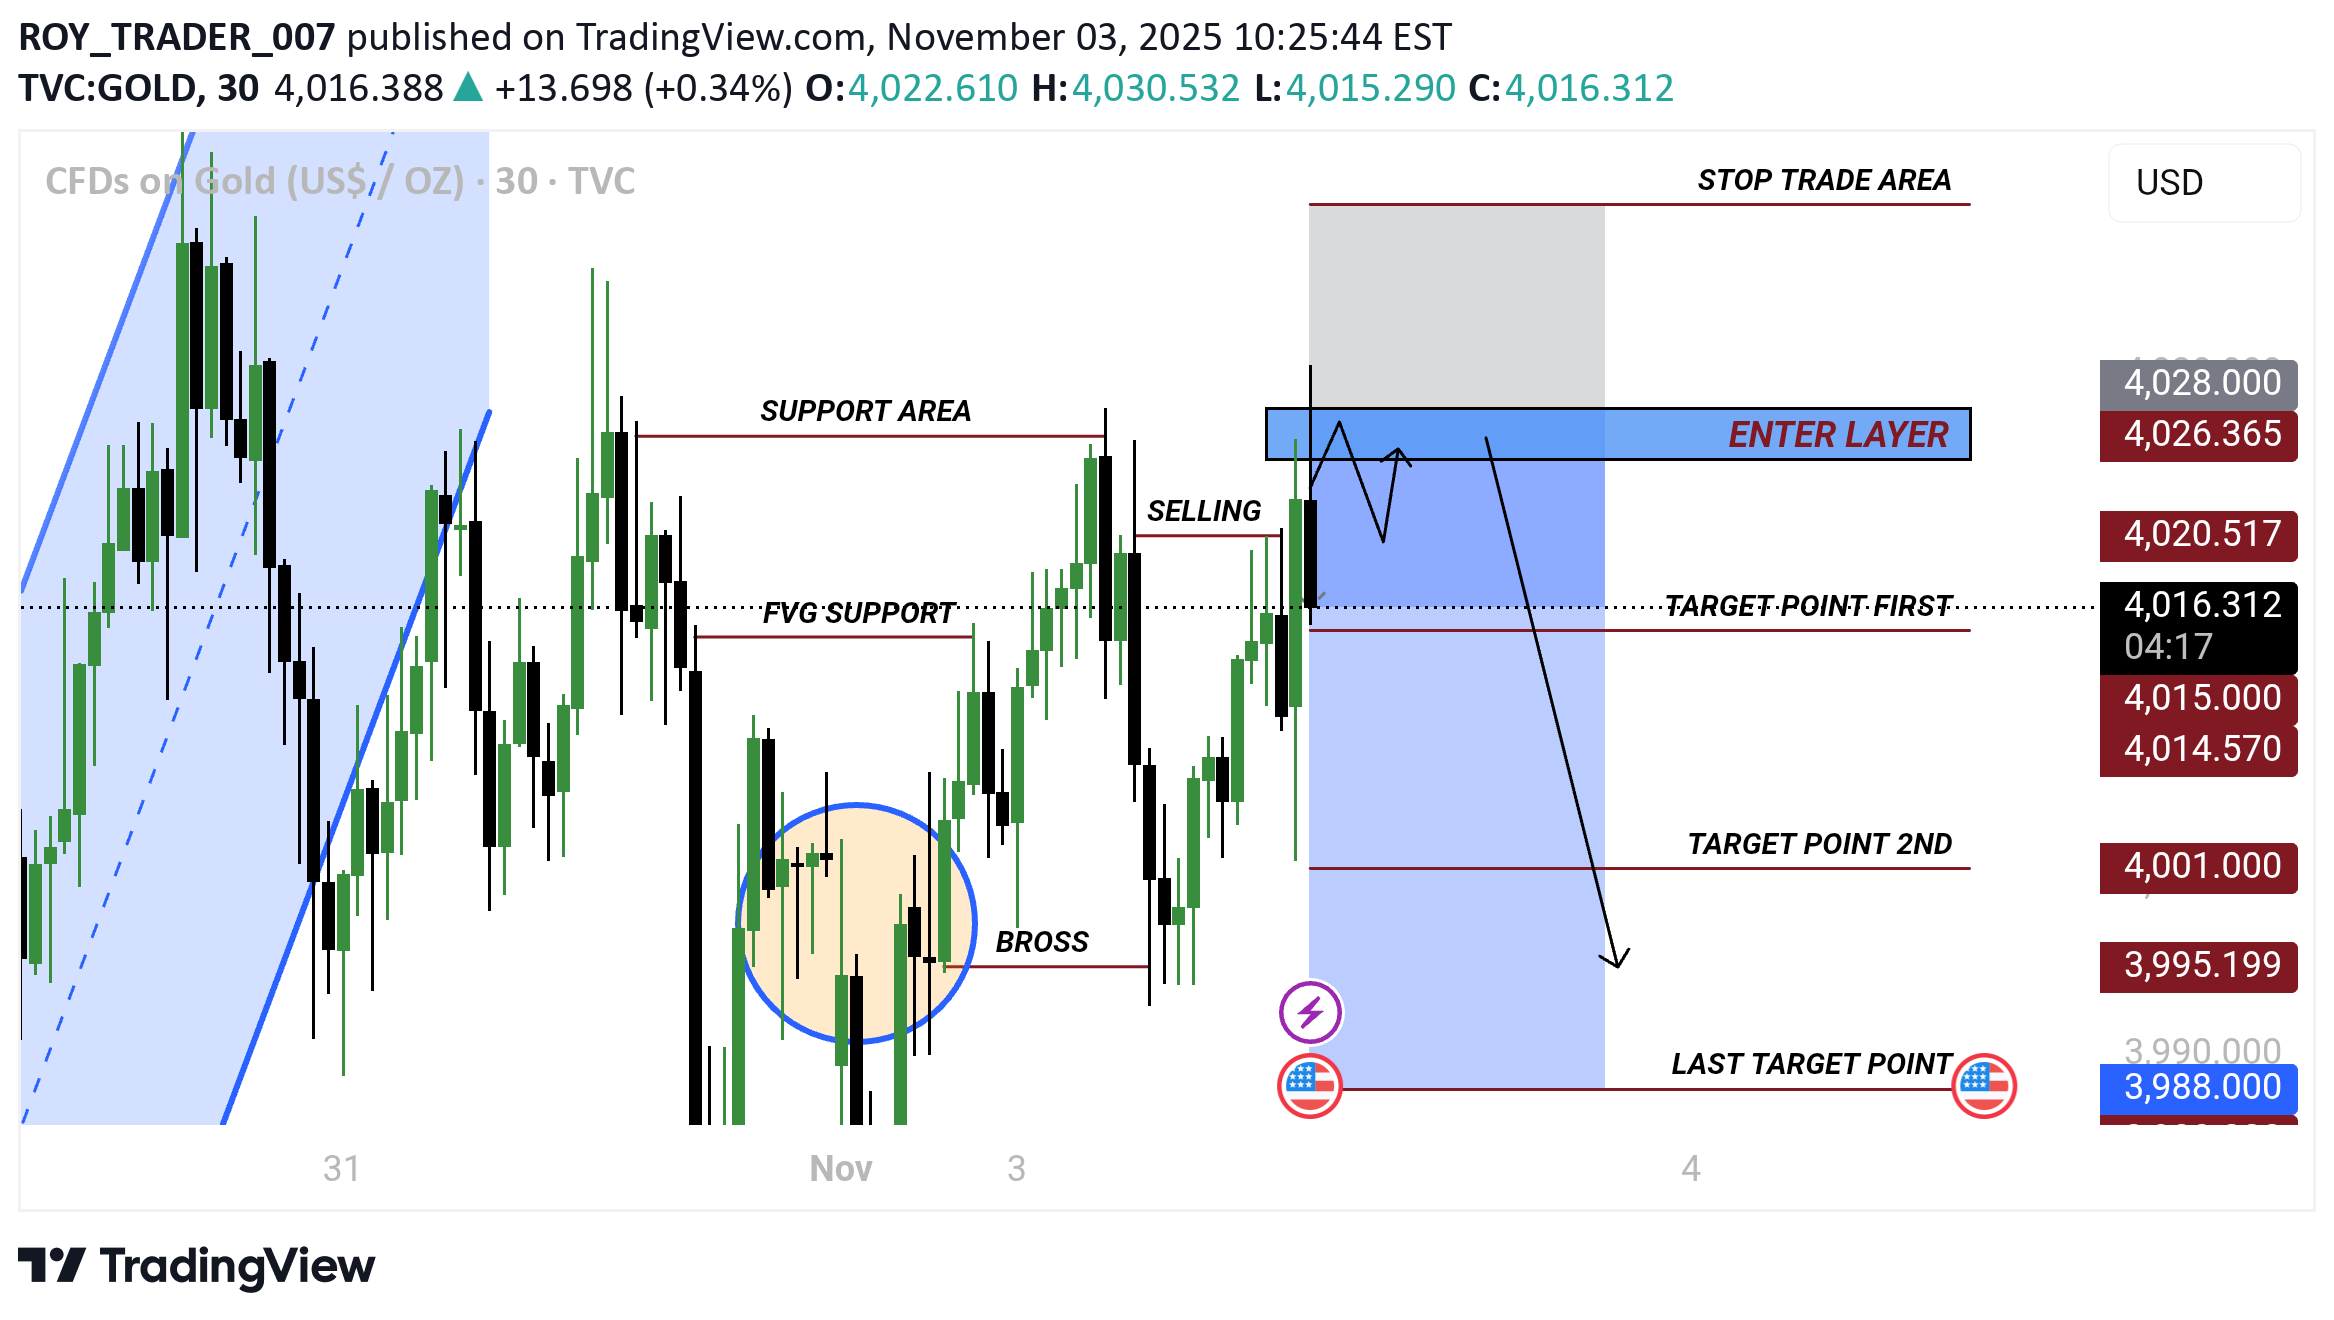
Selling Zone / Enter Layer Blue highlighted area where you plan to enter a sell trade. Entry expected after price retests this zone and shows rejection. Stop Trade Area The stop-loss zone, slightly above the entry layer — where your trade idea is invalidated if price rises above it. Target Points First Target Point (~4015) Initial profit area. Take partials or move stop to breakeven. Second Target Point (~4001) Stronger bearish continuation level. Last Target Point (~3988) Final take-profit zone — end of the bearish move expectation.
ROY_TRADER_007
SOLUSD TRADE SATUP READ CAPTION
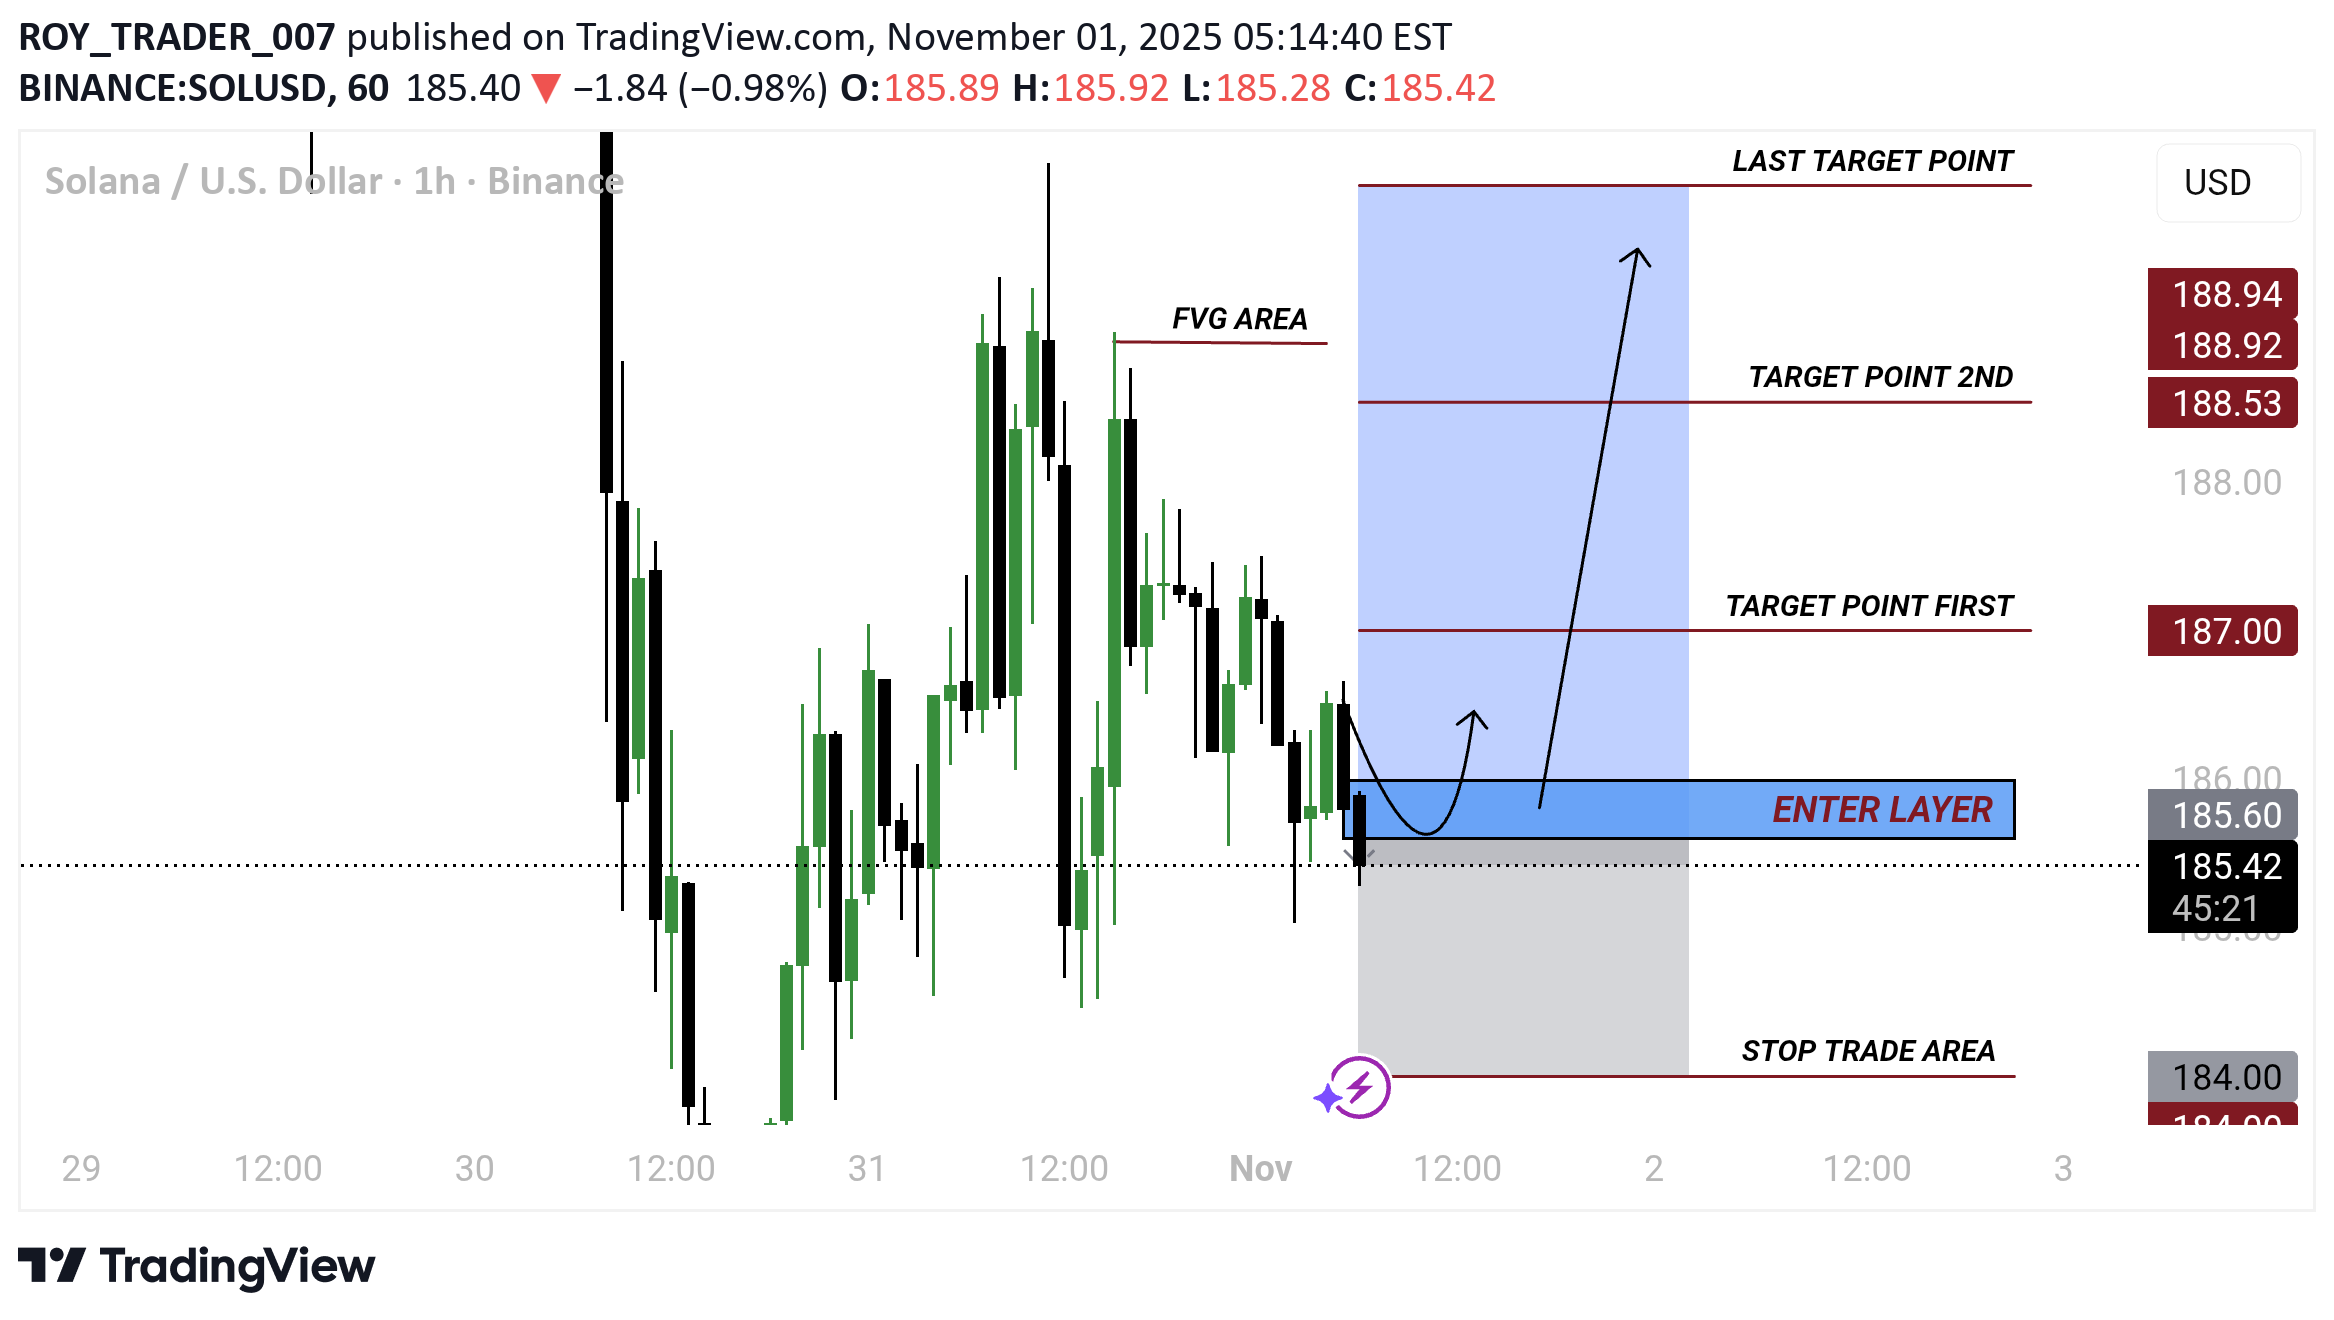
Enter Layer (185.60 – 185.40 zone): This is the suggested buy area. The price is expected to drop slightly into this blue zone before moving up. Stop Trade Area (Below 184.00): If the price falls below 184.00, the trade idea becomes invalid — it’s the stop-loss level to limit risk. Target Point First (187.00): The first profit target, a short-term goal once the price begins rising. Target Point 2nd (Around 188.50): The second target for further gains as momentum continues. Last Target Point (188.90+): The final target area if bullish momentum is strong.
ROY_TRADER_007
BTCUSD TRADE SATUP READ CAPTION
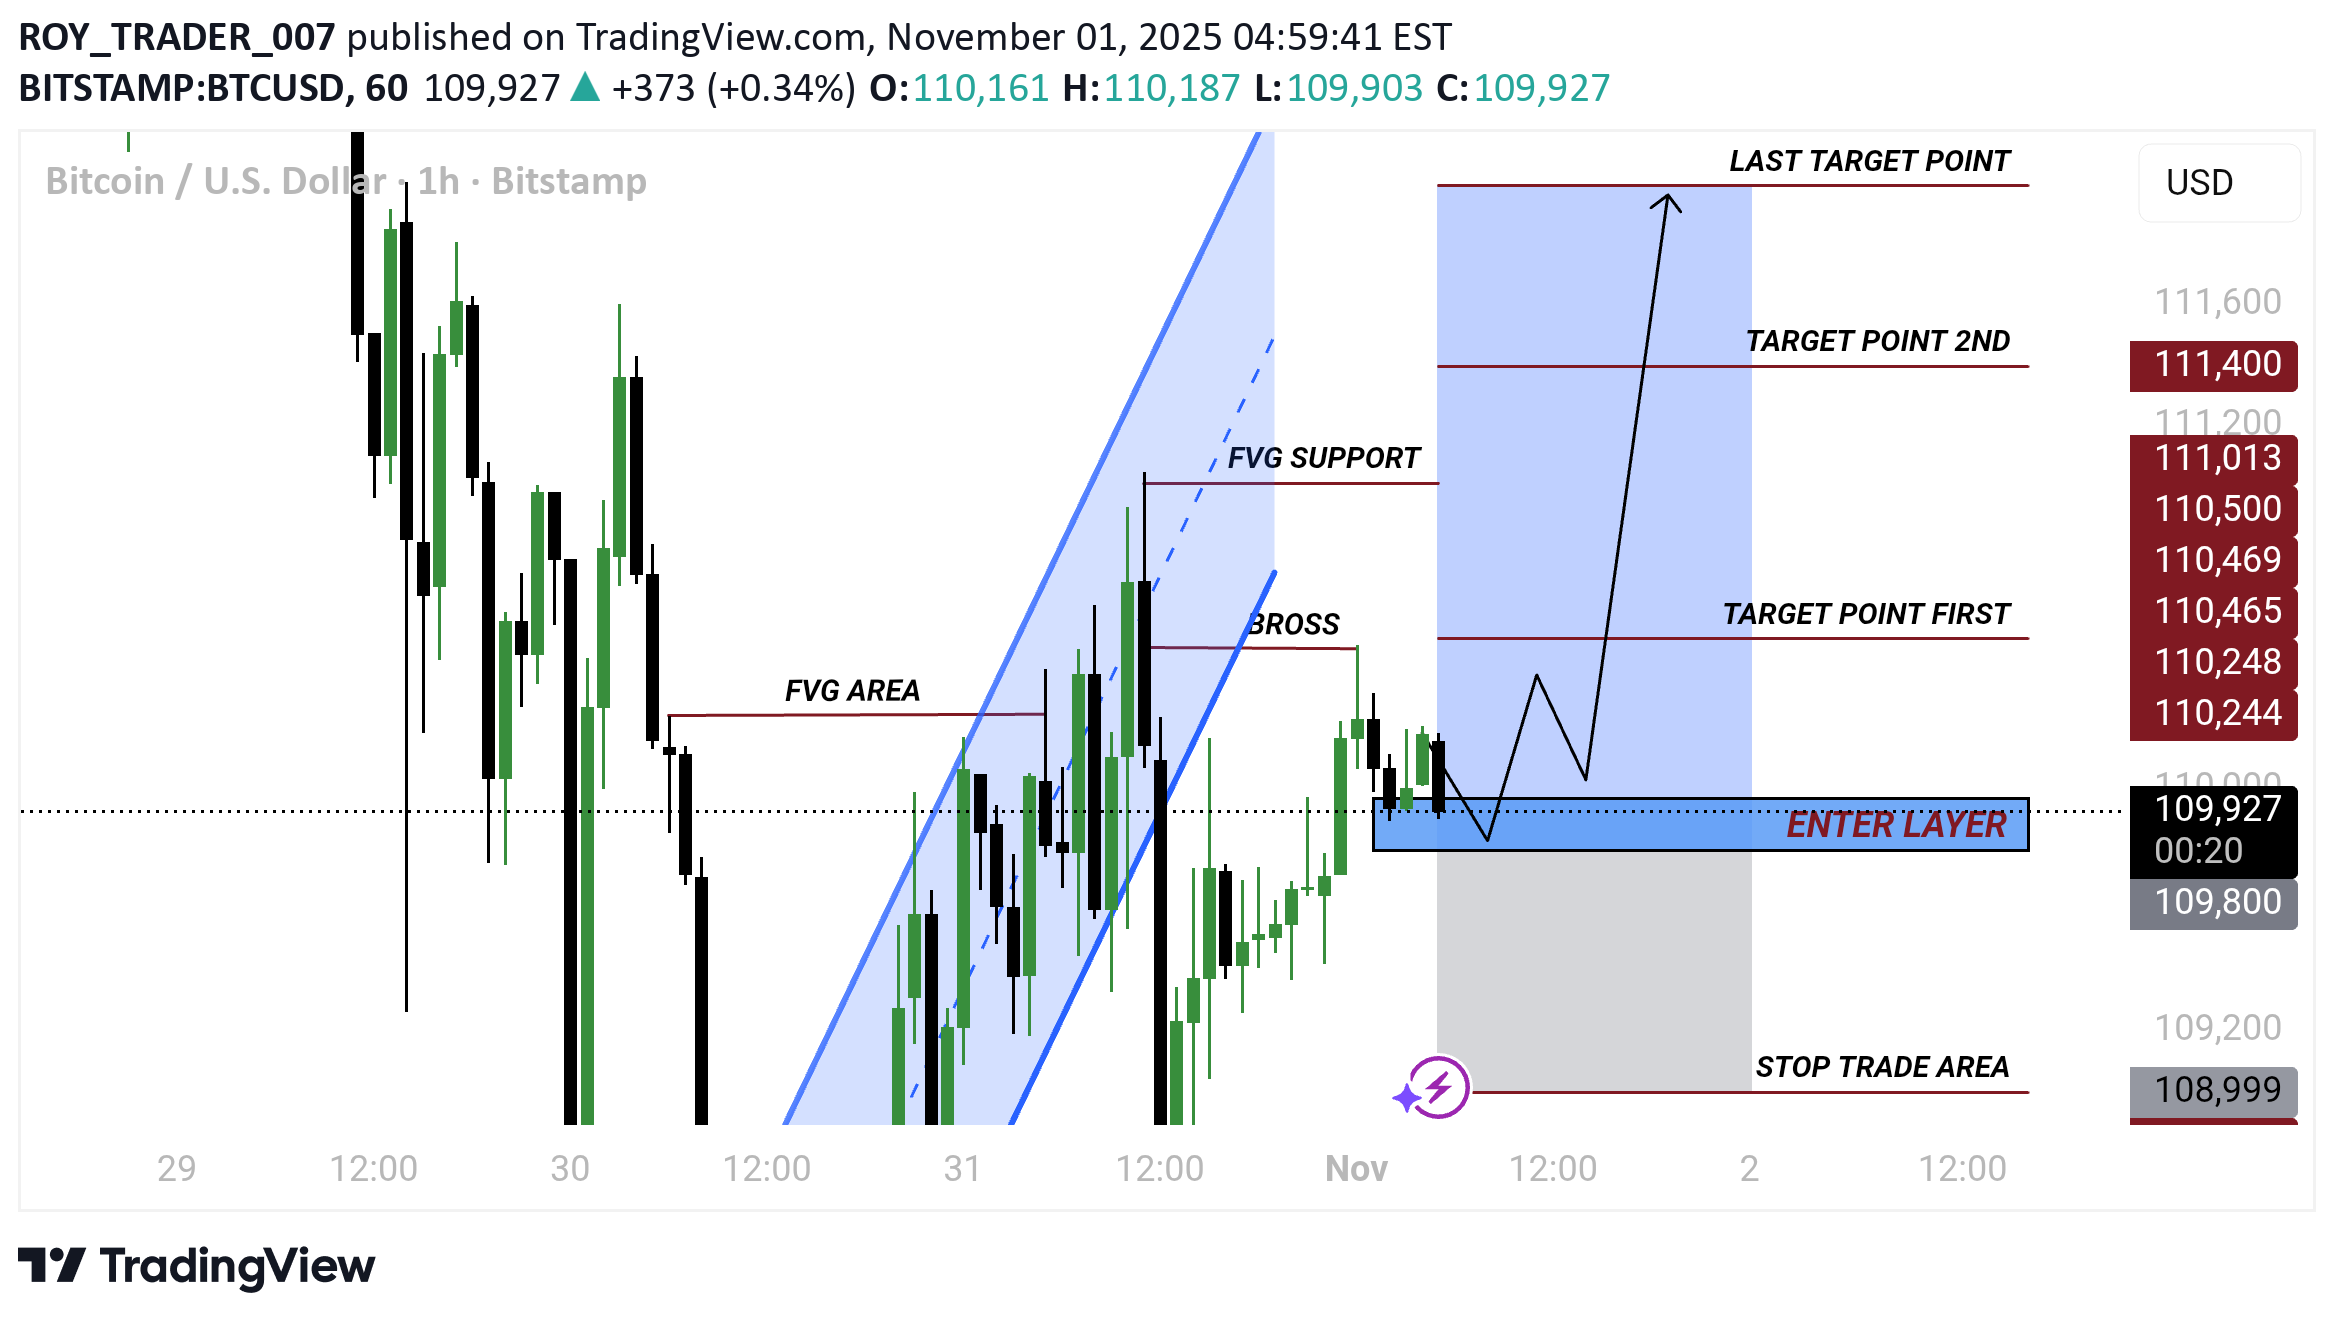
Enter Layer (around 109,900): → This is your buy entry zone where you expect price to reverse upward. → The blue box marks the ideal entry area. Stop Trade Area (below 108,999): → Your stop-loss zone. → If price falls below this, the trade setup is invalid. Target Points: Target Point 1: ~110,465 Target Point 2: ~111,013 Last Target Point: ~111,400 → These are your take-profit levels as price moves upward. Fallow risk management
ROY_TRADER_007
NEXT WEEK XAUUSD TRADE SATUP READ CAPTION
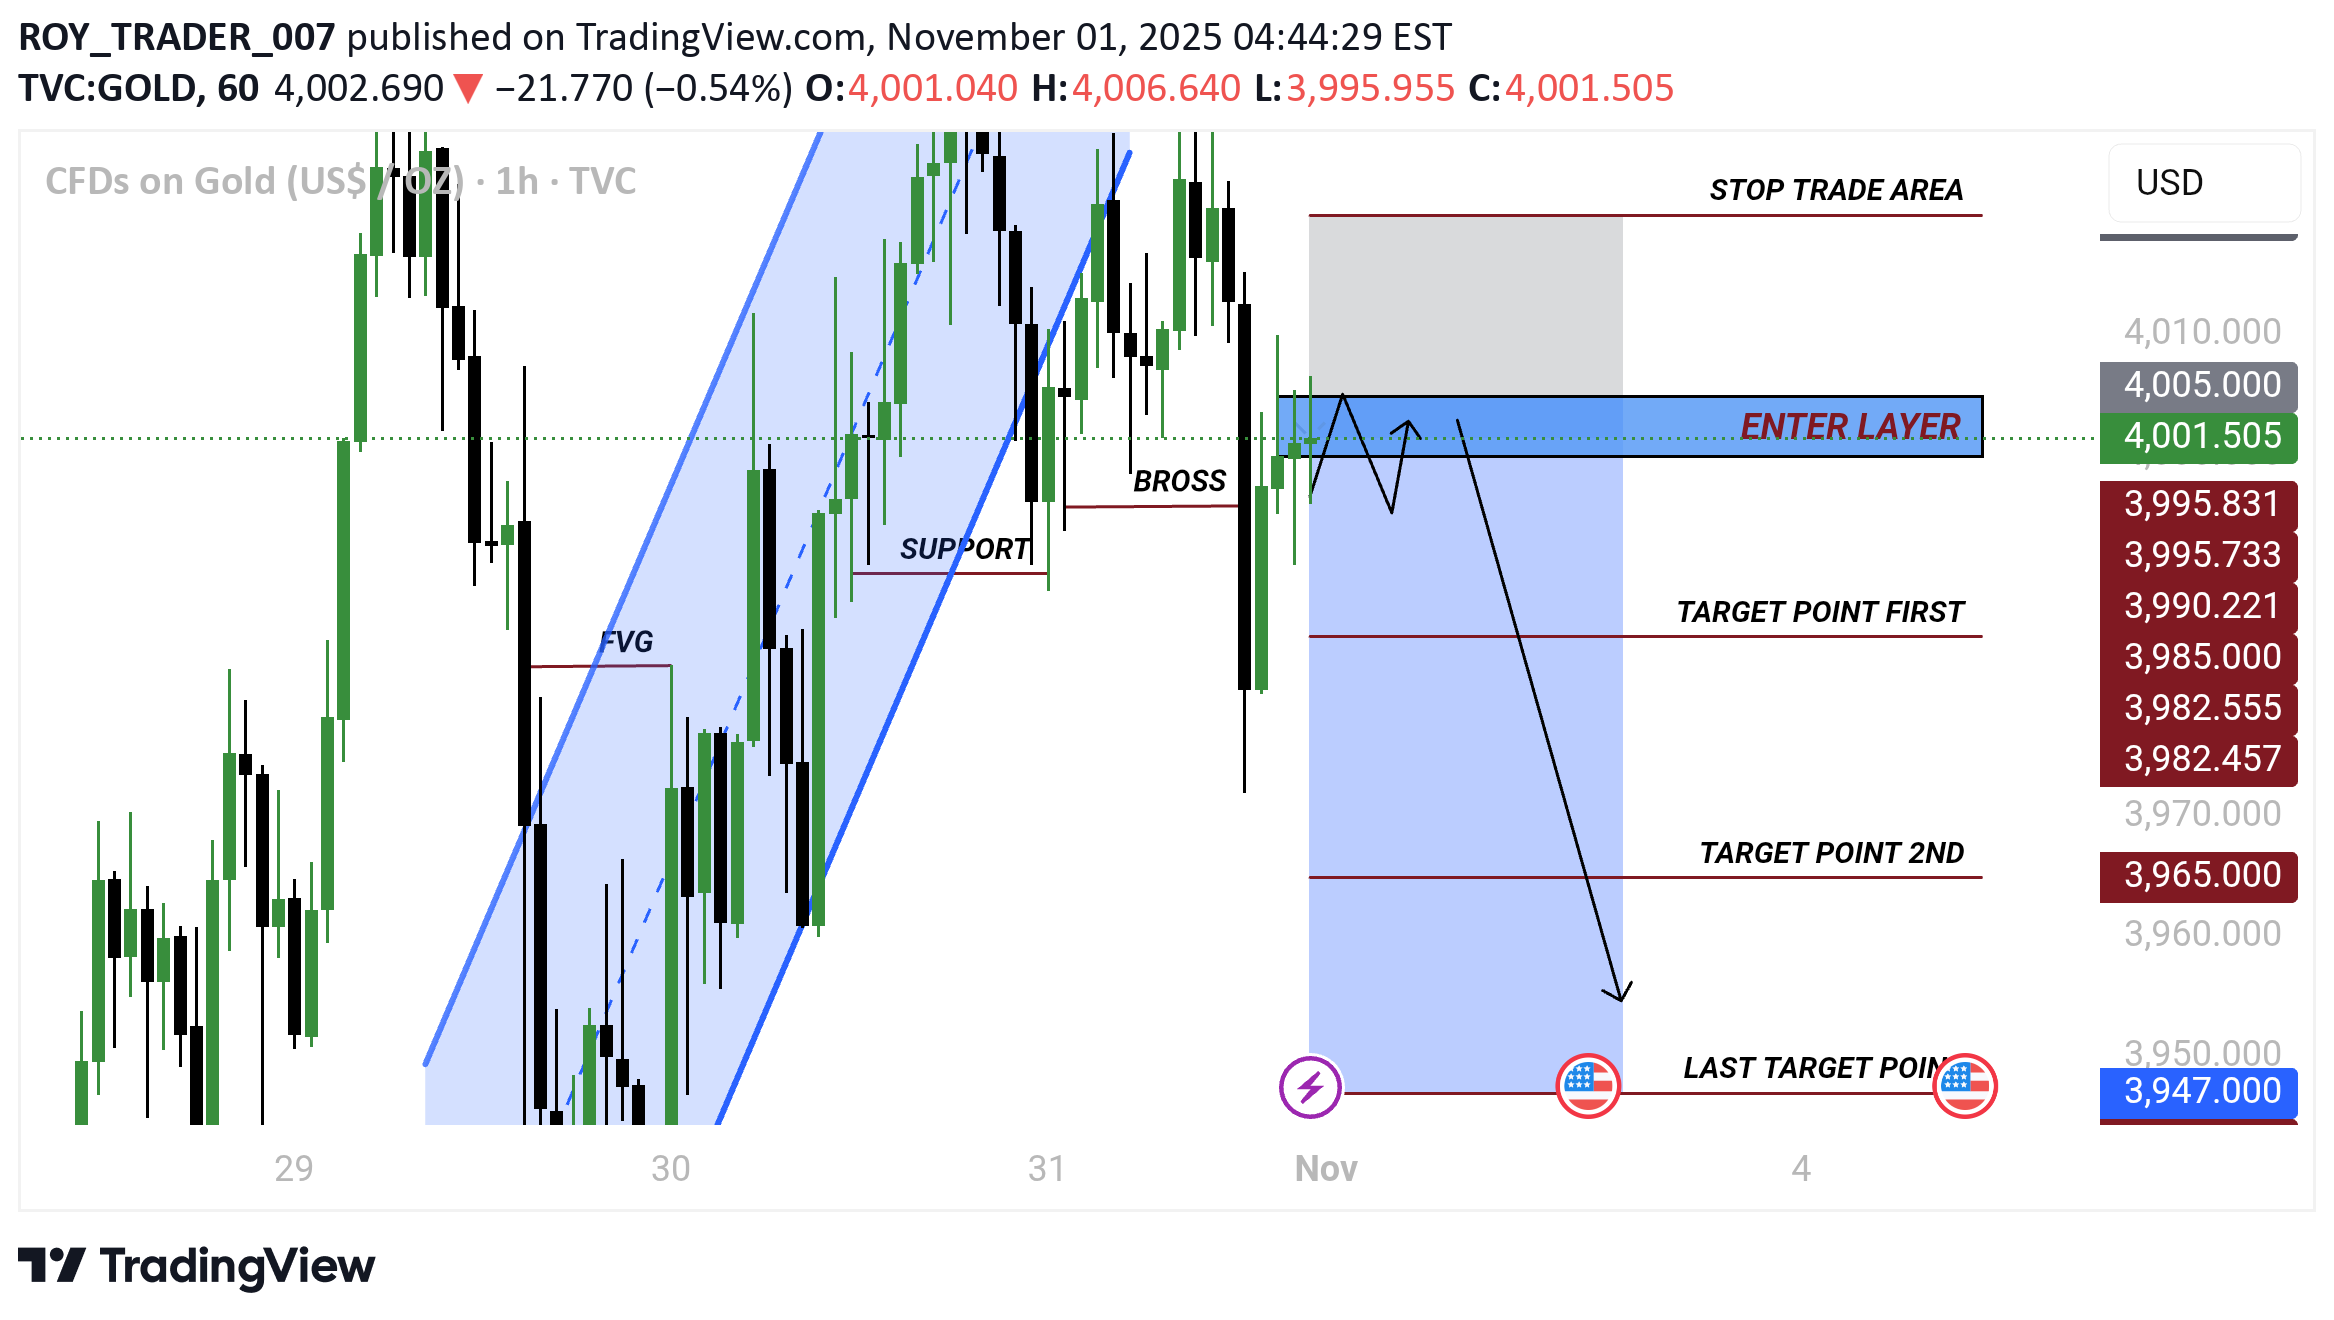
ENTER LAYER” This is the entry zone for the short trade (between roughly $4,000 and $4,005). The trader believes that once price revisits this zone, it will likely: Reject (fail to go higher) And drop downwards from there. This zone could correspond to: A previous support now turned resistance (BROSS), or An FVG (Fair Value Gap) area that might get filled. 🟥 3. “STOP TRADE AREA” This is the stop-loss zone, slightly above $4,005. If the price breaks and closes above this zone, the trade idea becomes invalid. Purpose: Protects the trader from heavy losses if the market goes against the plan. Target Levels These are the take-profit zones for scaling out of the short trade: Target Point First – around $3,995.8 → First partial take profit (secure some gains) Target Point 2nd – around $3,965.0 → Second partial target (continue to ride the trend) Last Target Point – around $3,947.0 → Final take profit level (close the trade)
ROY_TRADER_007
XAUUSD TRADE SATUP READ CAPTION
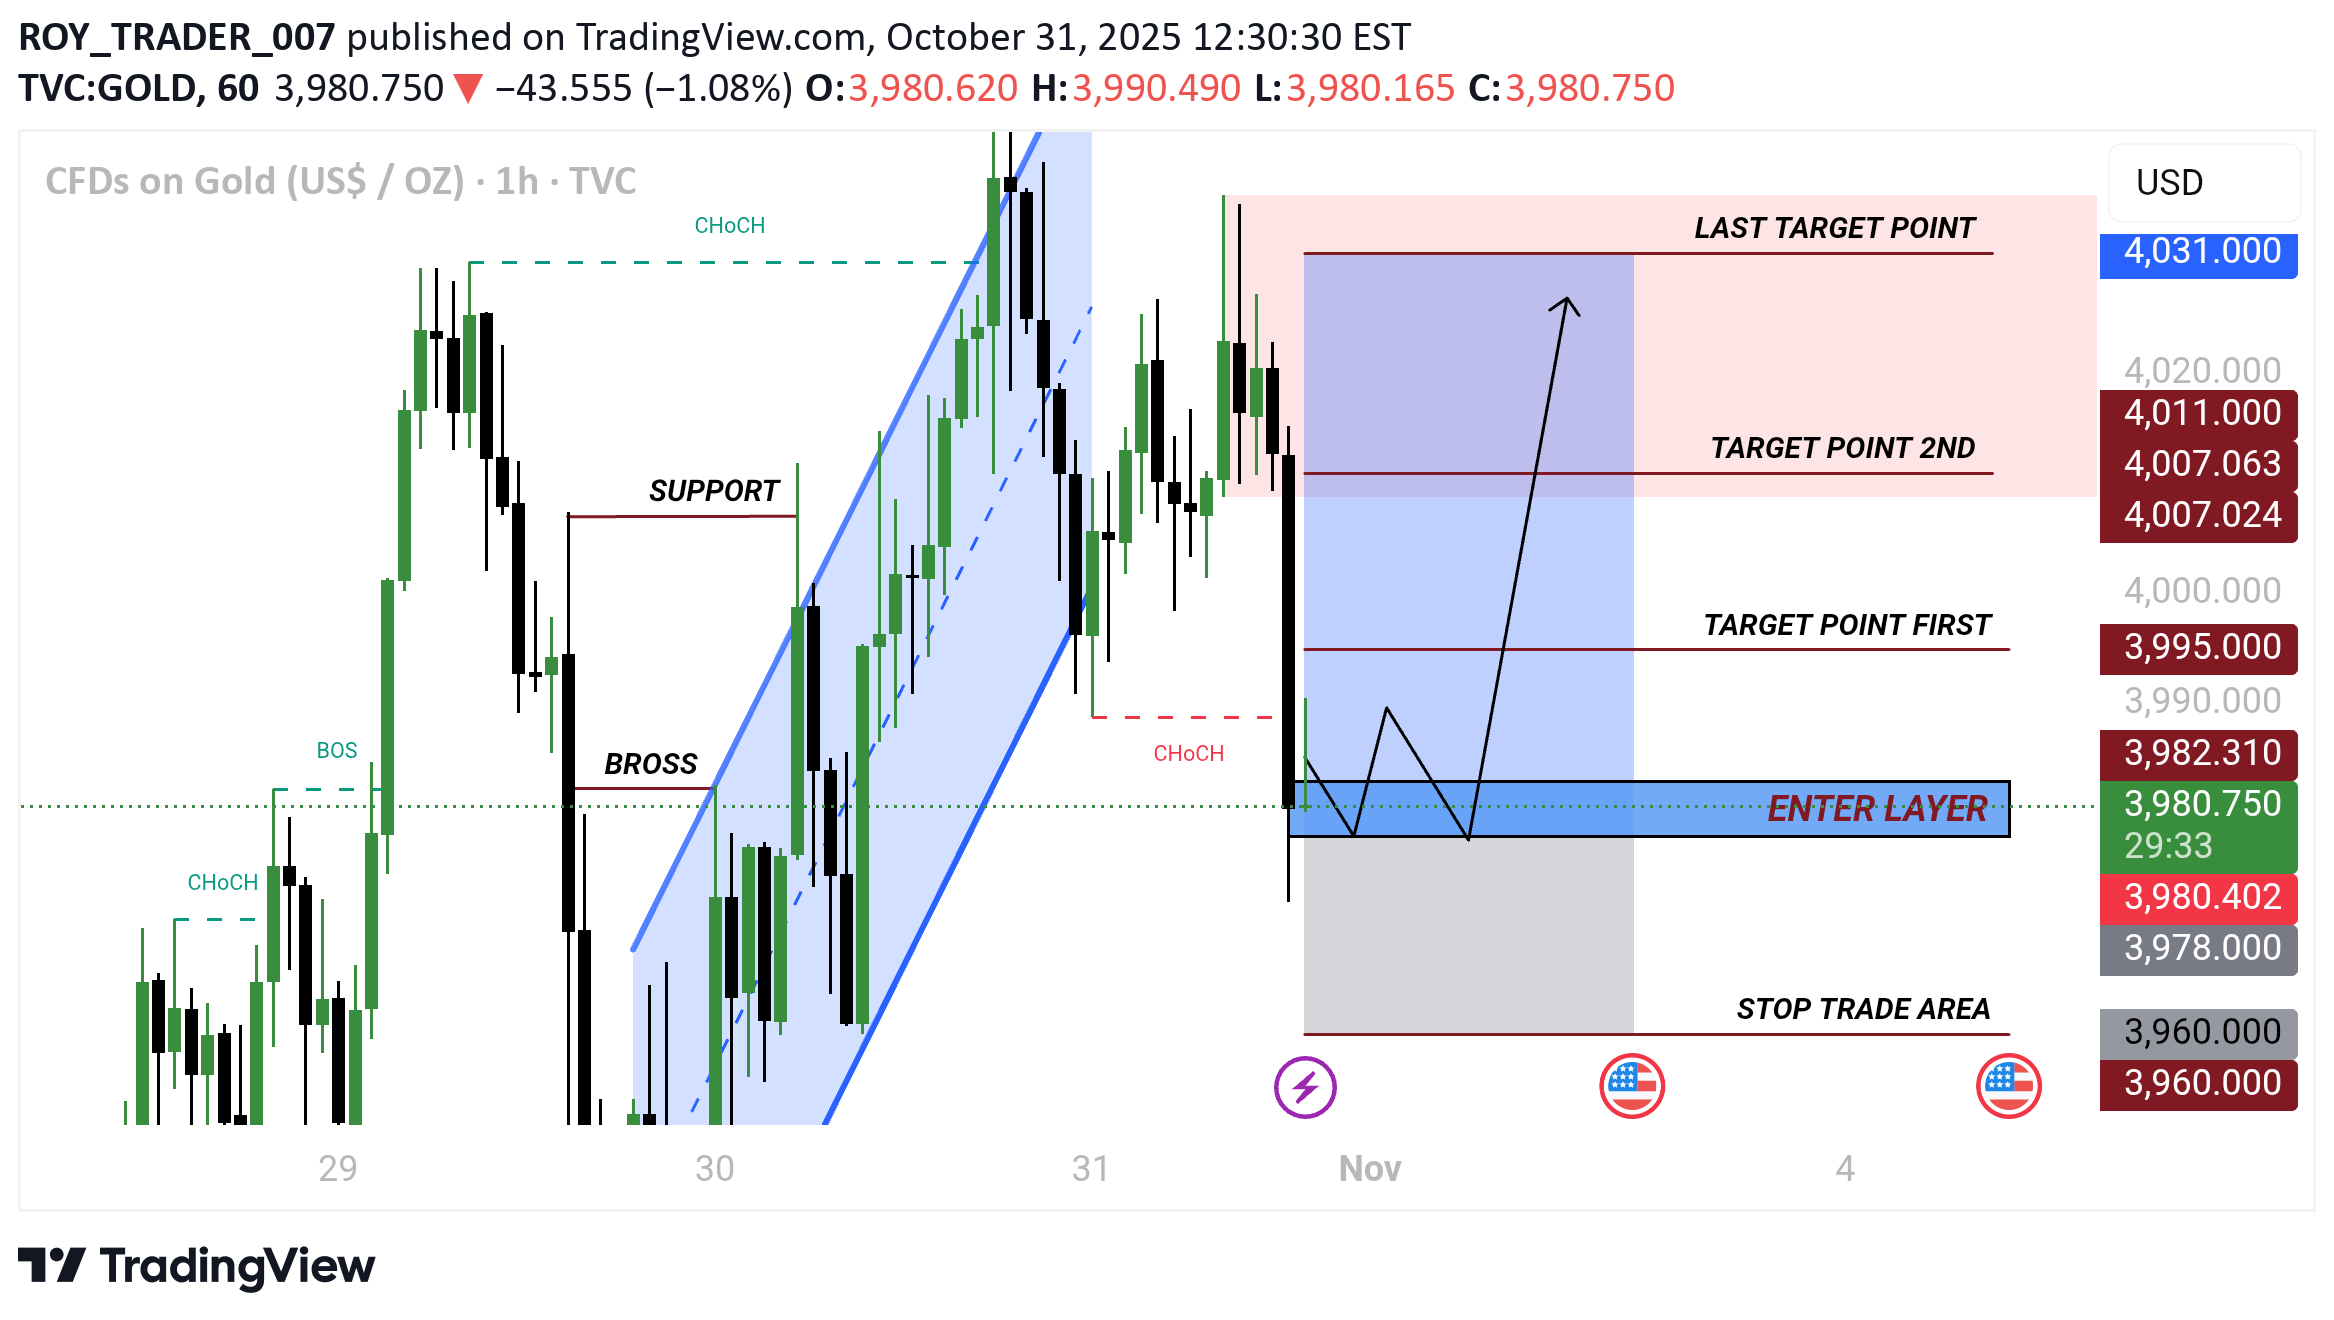
ENTER LAYER (Blue Zone) This is the planned buy entry area (around 3,982–3,986 USD). The trader expects price to retest this blue zone and then bounce up. 🔴 STOP TRADE AREA Located below at 3,960 USD. If the price goes below this, the setup is invalid, and the trade should be stopped. This protects capital from further losses. 🎯 TARGET POINTS There are three profit targets as the price moves upward: Target Point First: ~3,995 USD First take-profit or partial close area. Target Point 2nd: ~4,007 USD Second profit-taking area. Last Target Point: ~4,011 USD Final expected profit level if the move continues strongly.
ROY_TRADER_007
BTCUSD TRADE SATUP READ CAPTION
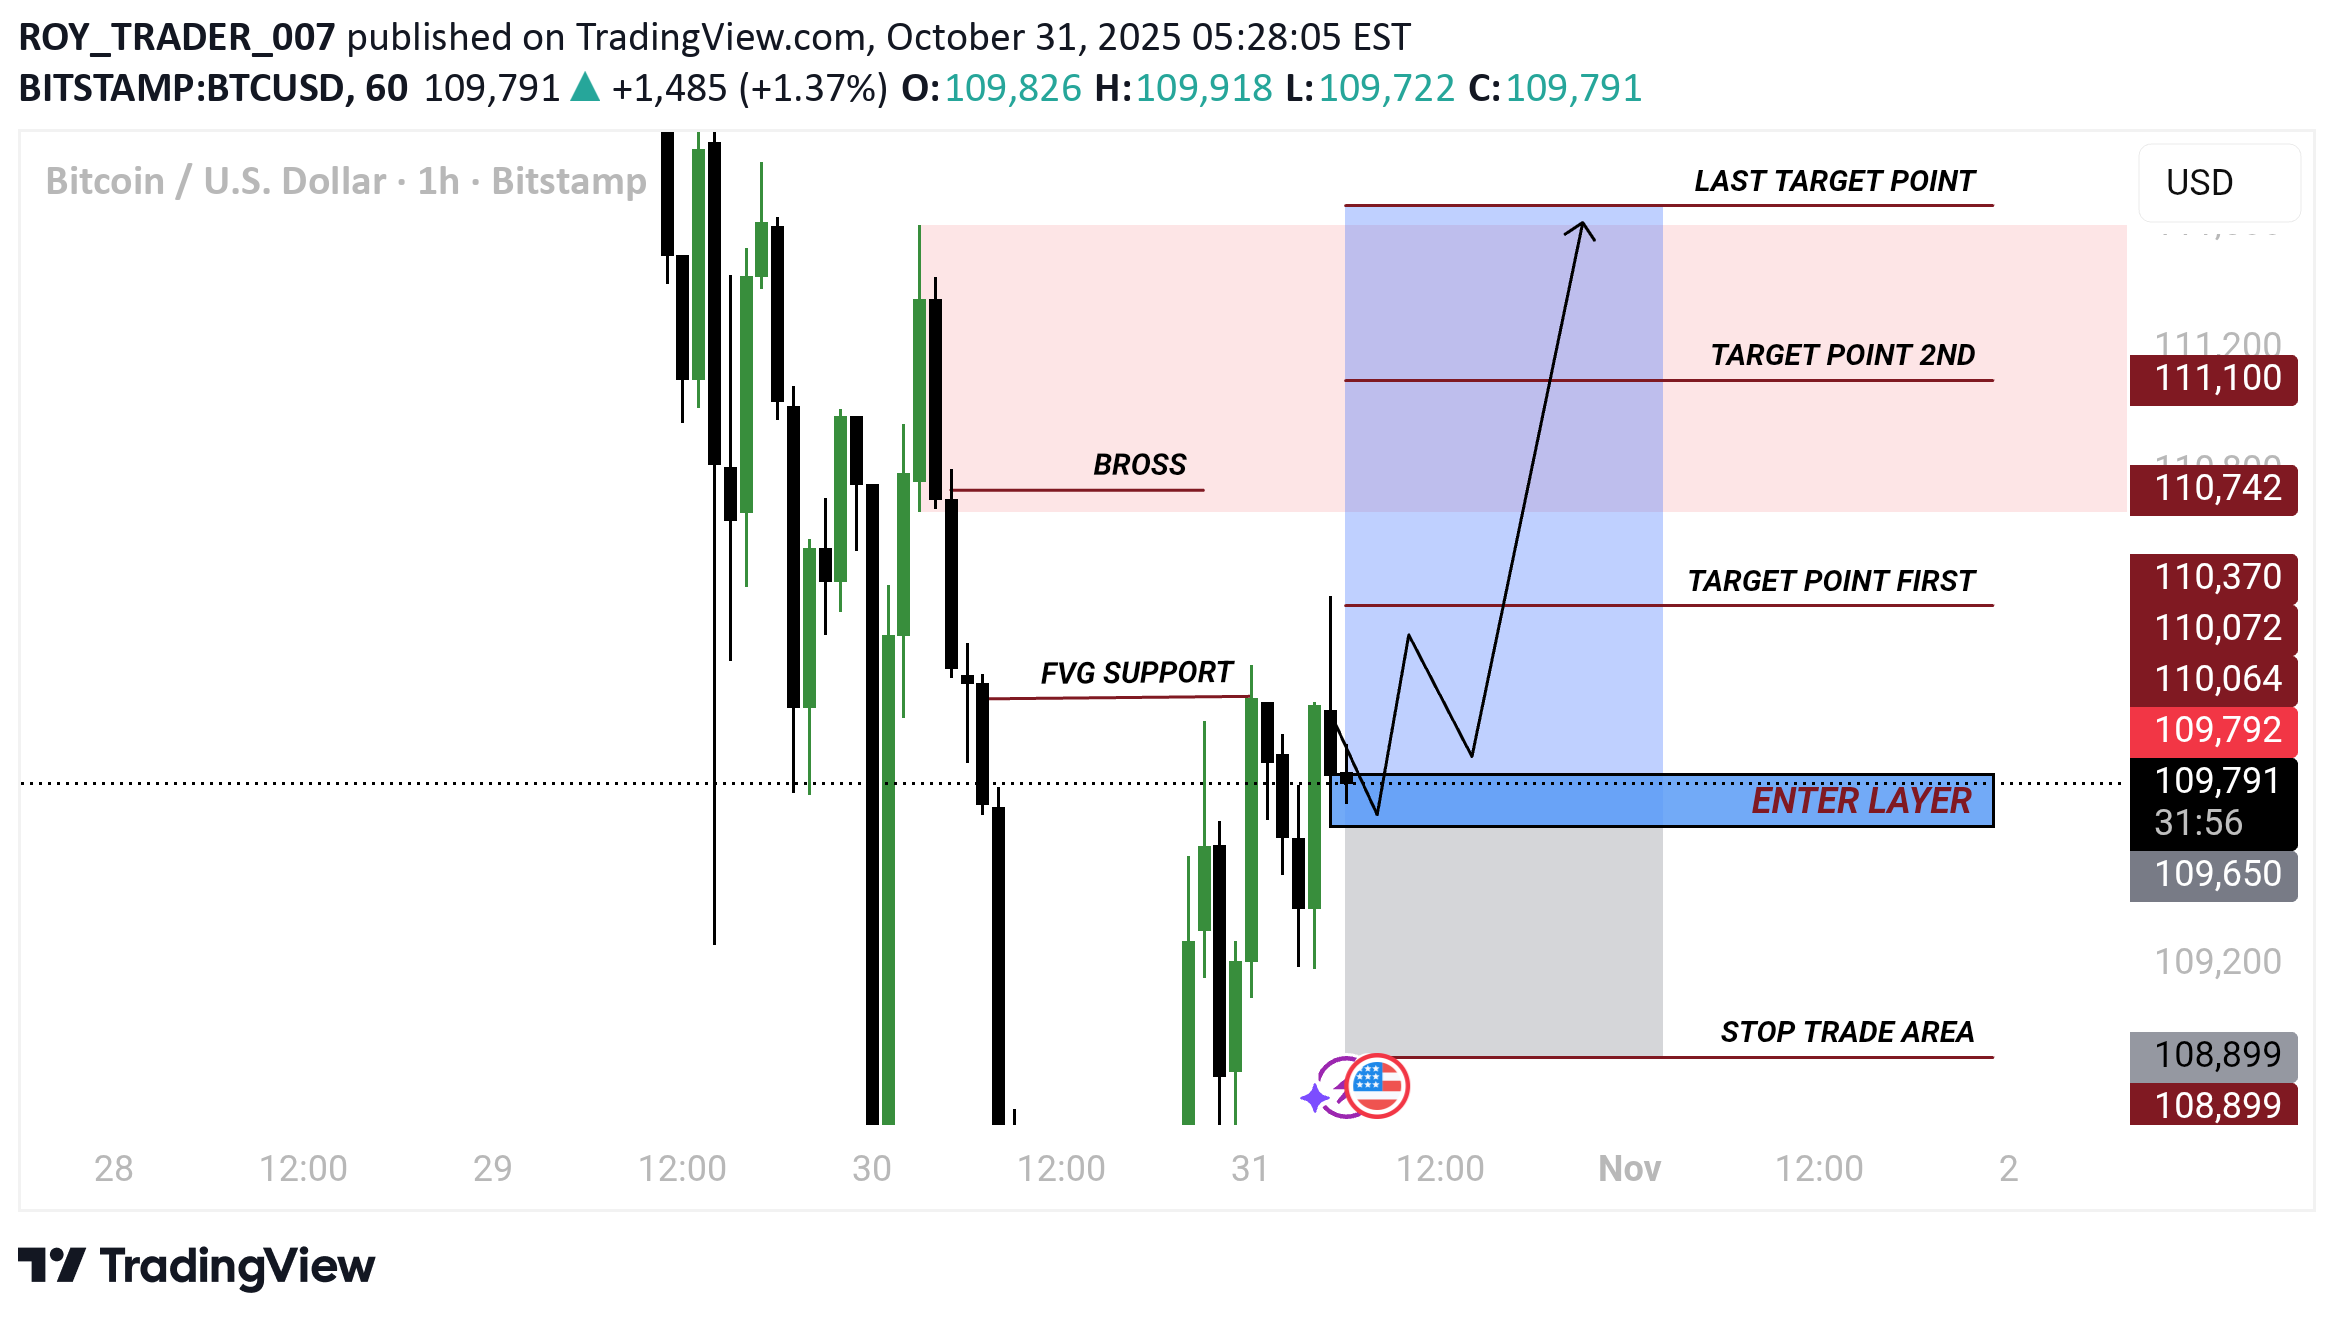
ENTER LAYER (Blue Zone) This is your entry zone — the price area where the trader plans to open a buy position. The label “FVG SUPPORT” (Fair Value Gap Support) means this blue area aligns with a Fair Value Gap, which is an imbalance in price that often acts as a support zone. The trader expects price to retest this zone before moving upward.STOP TRADE AREA (Gray/Red Zone at the bottom) This is the stop-loss area, where you exit the trade if price moves against you. The marked level is around 108,899 USD. If Bitcoin breaks below this area, the setup becomes invalid, as support has failed. 🔺 3. TARGET POINTS (Profit Levels) There are three profit-taking zones above the entry: Target Point First (~110,064) — the first level where the trader might take partial profits.Target Point 2nd (~110,742) — the second profit level. Last Target Point (~111,100) — the final target for maximum profit.
ROY_TRADER_007
XAUUSD TRADE SATUP READ CAPTION
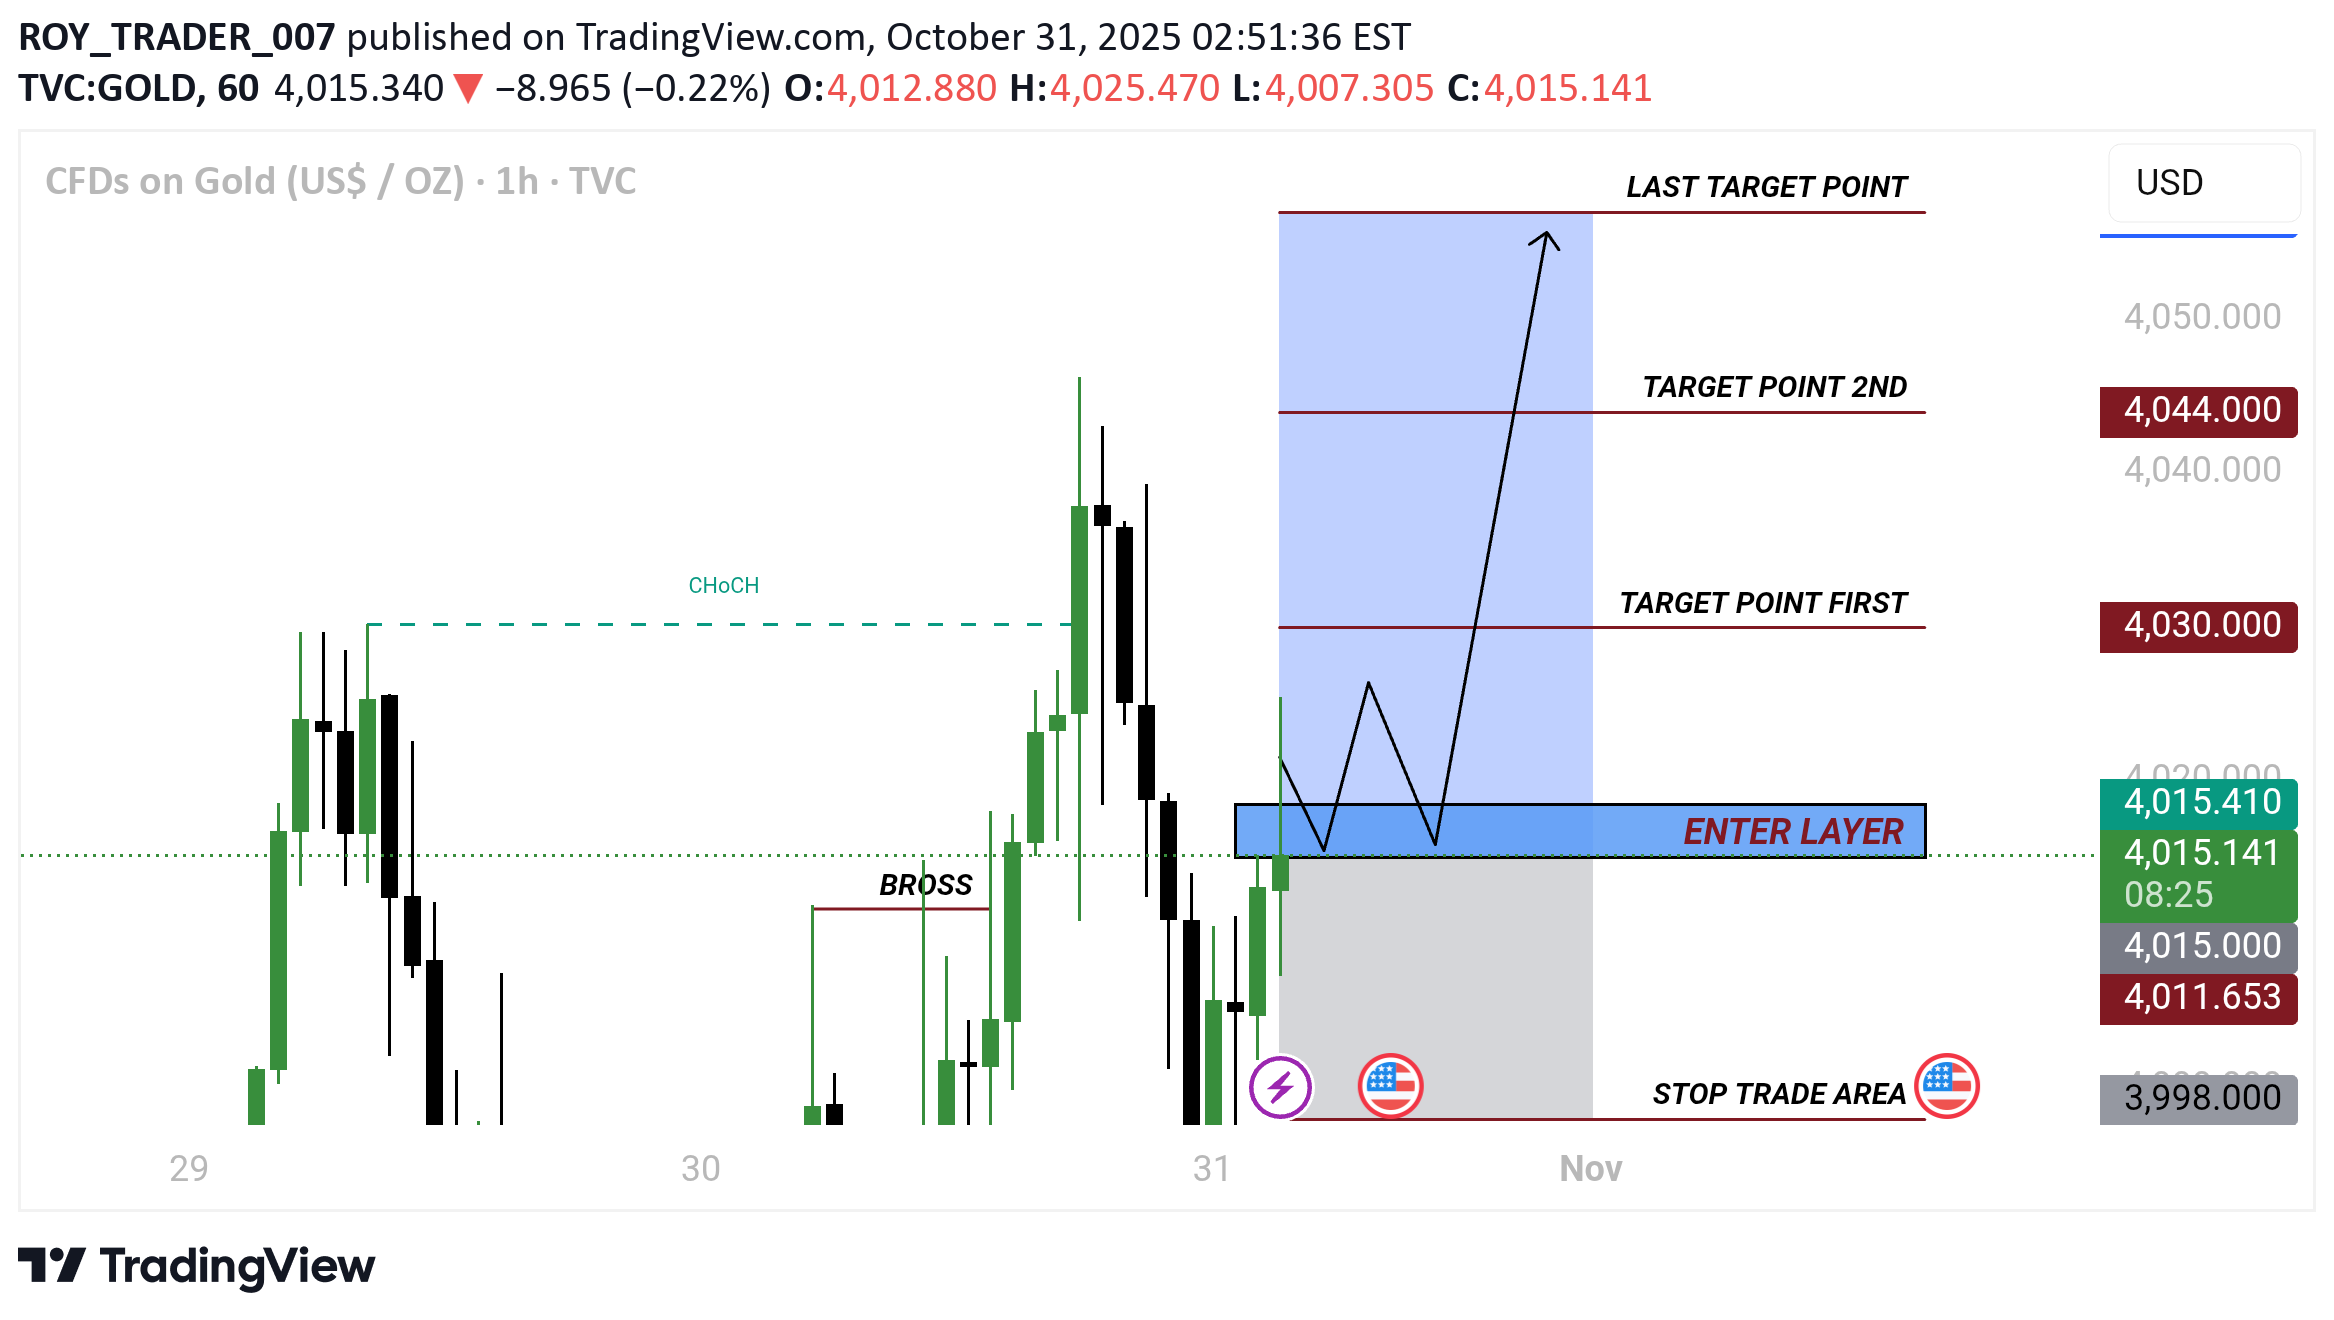
ENTER LAYER (Blue Zone) This is the planned entry area for a buy trade. The idea is to wait for price to come down and tap into this blue zone before entering a buy. It’s a support zone—where the trader expects buyers to step in. 🔻 STOP TRADE AREA (Gray/Red Zone near $3,998) This is the stop-loss zone, where the trade will be closed if the market moves against the setup. It protects from large losses. If price falls below this level, it invalidates the buy idea.TARGET POINTS (Take-Profit Levels) There are three profit targets: Target Point First: ~$4,030 Conservative target, often used to secure partial profits. Target Point 2nd: ~$4,044 Mid-level target, for additional gains. Last Target Point: Higher zone (~$4,050) Final target, where the trader might exit the entire position.
Disclaimer
Any content and materials included in Finbeet's website and official communication channels are a compilation of personal opinions and analyses and are not binding. They do not constitute any recommendation for buying, selling, entering or exiting the stock market and cryptocurrency market. Also, all news and analyses included in the website and channels are merely republished information from official and unofficial domestic and foreign sources, and it is obvious that users of the said content are responsible for following up and ensuring the authenticity and accuracy of the materials. Therefore, while disclaiming responsibility, it is declared that the responsibility for any decision-making, action, and potential profit and loss in the capital market and cryptocurrency market lies with the trader.